Candace, my beading buddy and fellow townie, has put me on her Make My Day List. This is a list of links to those who have really inspired me lately. Oh, I know who I have to put!!! The following ladies are not just inspirational but I know them in real life because they live near me or from etsyBead activities. Ladies, I just drink in your creativity! I love what I am doing with beads, but I also love what you do, that I could never do, because you've taken a different direction into uncharted territories where I cannot follow!
How to send a You Make My Day award:
1. Write a post with links to five blogs that make me think and/or make my day.
2. Acknowledge the post of the award giver.
3. Display the 'You Make My Day Award' logo.
4. Tell the award winners that they have won by commenting on their blogs with the news.
Candy - because of her totally unique leafy tendril earrings AND OMG!!! Look at these amazing Tribal Spirit earrings!!! Candy is the Queen of beautifully antiqued and forged sterling silver.
Augusta - look at this lovely handworked sterling filigree, I am in awe!
Deb - my mentor from etsyBead Street Team, who makes lovely concoctions from Hong Kong, halfway across the world! Deb has an unexpected and freshly lovely color sense I treasure and that inspires me!
Lucia - who I found through Etsy Local, and who lives just a couple minutes away from me in Allentown. She creates elegant, juicy, lovely pieces with vintage style and impeccable detail. I love her bright colors and the way she combines them.
Lawatha - with whom I'm collaborating as part of an etsyBead/Glass Artists campaign. I'm having a TERRIBLE time selecting one of Lawatha's glorious pendants to create a beaded necklace - they're all so beautiful!
Thursday, February 28, 2008
Wednesday, February 27, 2008
Wrapping my Mind in Color Trends
This blog records my process of creating art jewelry,with adventures, examples, and techniques! Not to mention creative inspiration! Click on the images to enlarge.
So I'm trying to figure out what color schemes stand out this Spring. Of course this was decided long ago - 24 months ago most likely - by the Power Deciders at WWD, Style Magazine, Pantone, Vogue et al. So I poked around the internet a bit and snagged some palettes and photos from the fashion world to help me understand what's behind the interesting color combinations I'm seeing. Follows some of my visual notes ...
Tuesday, February 26, 2008
Collaboration
This blog records my process of creating art jewelry,with adventures, examples, and techniques! Not to mention creative inspiration! Click on the images to enlarge.
The etsyBead Street Team and the Creative Glass Guild of Etsy are sponsoring a collaboration where a glass artist contributes a glass piece and an etsyBEADer creates a beaded piece with that glass piece. All final pieces are being donated to charity. I'm working with Lawatha, who creates amazing lampwork glass pendants and pins. Here I'm matching some of the stuff in my bead stash to some of her focal pendants. She'll come over here and let me know which of these combos she prefers.
Saturday, February 23, 2008
Homemade Light Box: Refined!
This blog records my process of creating art jewelry,with adventures, examples, and techniques! Not to mention creative inspiration! Click on the images to enlarge.
OK, here's my new improved light box. I designed it specifically to help me take good photos of my pieces with glass that seem dull photographed the ordinary way.
As noted in the previous post, the sides are cut from Wondermat tiles (see Resources on right - you get 4 tiles for $7.00) although in this version in addition to cutting a 9-inch square out of each center, I've also cut the groovies off one edge of each tile. This allows the light box to be bottomless, so it can sit on my rippled glass patio table and I can take advantage of reflected light from below. Note: The diffuser inserts are cut from translucent notebook covers.
This model also has only two sides instead of three, because I've found I don't need a back, really. Especially since my patio table is round. Because of this, it's sensible to have the light box footprint to be in the shape of a pizza slice. If this makes sense!
Sometimes I want a panel on the top of the box, sometimes I don't. (If I shoot a top view, no panel. If a shot from the front, then a panel on top with a light shining in through there.) I want this top panel to just sit on top so it's easy to remove as I'm taking photos. Therefore the little triangle half-frame as a shelf and to give the box added stability.
Voila! Now how do I use this? I've been using two lights but I really need three - one to shine from each side and one to shine through the top. I'm using the natural spectrum lamps I also use to light up my work table. I'll see if I can find another lamp on sale somewhere. You can use any lamps as long as they are all the same kind of bulb (tungsten, fluorescent, halogen or "natural spectrum").
I also use a stool or tray that sits below the patio table 6 or 9 inches below its surface. On top of the stool I can put any kind of pretty paper that complements my jewelry. The light shines through the top of the table and reflects back with a kind of pretty, watery, colorful effect, and shines through my glass beads a bit from underneath. If you try this, practice with the lights so you don't get glare shining off the surface of the glass. Just move them around until you get the jewelry and the reflections just right.
Go ahead, give this kind of thing a try! It works the best with all silver jewelry and with glass that needs a bit of a light boost or looks dull on regular white paper.
Wednesday, February 20, 2008
Ashly Forever
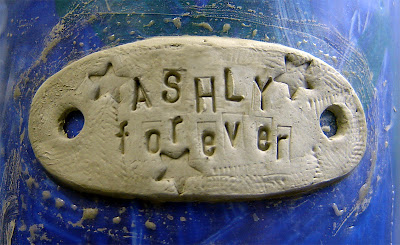
Nearly one year ago, on March 3, 2007, Army Sergeant Ashly Lynn Moyer was blown up by an I.E.D. in Baghdad, Iraq. This brave young girl was the best friend and stepdaughter of my buddy Peggy Sue. I didn't know her well, but met her on several occasions and was touched by her poise, energy and spark. Our entire community mourned the loss of this special young person and each of us has been moved to contribute to a memorial in her honor that is being erected at the middle school she attended.
Anniversaries are so hard! So to make it go easier for Ashly's family and friends, and in honor of her courage and spirit, I've begun to make a bracelet that will feature an oval focal piece in precious metal clay that says "Ashly Forever." PMC is not coming easily to me, but here's my nth attempt, is it somewhat successful? I'm going to string it on leather and include some wide-hold tube beads in sterling silver - once it's fired will start experimenting. There will be two bracelets - one for Michael, Ashly's father, and one for Peggy Sue.
These four versions of a focal element you see here are my original, on the bottom, and then my photoshopped improvements with and without stars in ascending order, with the "best" version at the top. Probably I should have wrapped the wet piece in plastic wrap because now I'd like to start over and do something completely different!!! However, I believe with precious metal clay you can just pulverize the dry thing with a hammer and mix with water to return it to its clay condition.
This is about $6.00 worth of clay and it is about 2-1/2 inches long. PMC shrinks about 30% in firing so it will be about 2" in the end.
Wednesday, February 13, 2008
Homemade Light Box
This blog records my process of creating art jewelry, with adventures, examples, and techniques! Not to mention creative inspiration! Click on the images to enlarge.
I've been doing more photography than beading lately! This is my homemade lightbox setup based on what I've learned from Etsy's Storque articles and a great site (just do a search on EZ Cube - this is a terrific product they sell and as well they have articles on photography).
First thing with photography: you need to diffuse the light. That's why a light box. Mine is created with Wondermat tiles with squares cut out to hold the translucent inserts. I made the inserts by cutting squares from plastic notebook covers from the Staples Store. The squares are exactly the same size as the holes in the Wondermat and they just sit there, no gluing or taping required.
I'm using three lights, and two are those natural spectrum ones, although with the third I've cheated and have an incandescent light. Supposedly you can't get the light balance right unless you use all the same kind of light, all incandescent or all fluorescent or all natural spectrum.
Since some of my shots are from above I have the top sort of loose so I can diffuse but also get at an overhead shot.
I'm playing with scrapping paper for backgrounds and also under glass. Glass is tricky due to glare from the flash, but it's wonderful when you get it just right.
You MUST use a tripod to get sharp photos! The tripod is in the front.
Tuesday, February 12, 2008
Store-in-a-Box: Display
This blog records my process of creating art jewelry, with adventures, examples, and techniques! Not to mention creative inspiration! Click on the images to enlarge.
Here's my Baby Be Mine necklace/earrings set in a greeting card box with scrapping paper insert. You can see it in my Store-in-a-Box on top of Water Nymph. Each store/display box has its own paper insert color coordinated with the necklace it holds.
Here's the box all packed. And below you can see the display on a table. Nifty, huh?
Come back soon, I'll have pictures of the cart/portable table I'm using with this.
Sunday, February 3, 2008
Sparkle Quest
This blog records my process of creating art jewelry, with adventures, examples, and techniques! Not to mention creative inspiration! Click on the images to enlarge.
I have this really pretty Valentine's necklace - actually I have two of them, because I knew as soon as I made it that I wanted one for myself and one to sell. The hard part is capturing how sparkly the crystals are on this piece and how beautifully the dark pink seed beads complement the pale pink Swarovski crystals. Not to mention somehow conveying the way the silver disks are in constant movement against the silver balls.
Up until now I've been photographing my pieces against pastel-color scrapping paper, with a nice texture, and it's been great for most of my pieces. Below you see my PRESENT technique.
So ... since I really love MangoTango's technique of shooting against rippled glass, I tried a couple shots against my patio table with hot pink paper underneath (my EXPERIMENTAL technique). Now Miss Mango's stuff is mostly silver, and mine is silver and glass, so I don't know how successful it is for my jewelry. I mean, it's beautiful, but does it show the necklace well?
All I know is I really want stuff in my shop to POP. So it's a work in progress. Here are some of the other photos I took, compared with the photos presently in my shop. Which technique do you think is better?
Subscribe to:
Posts (Atom)